 Pin Recipe
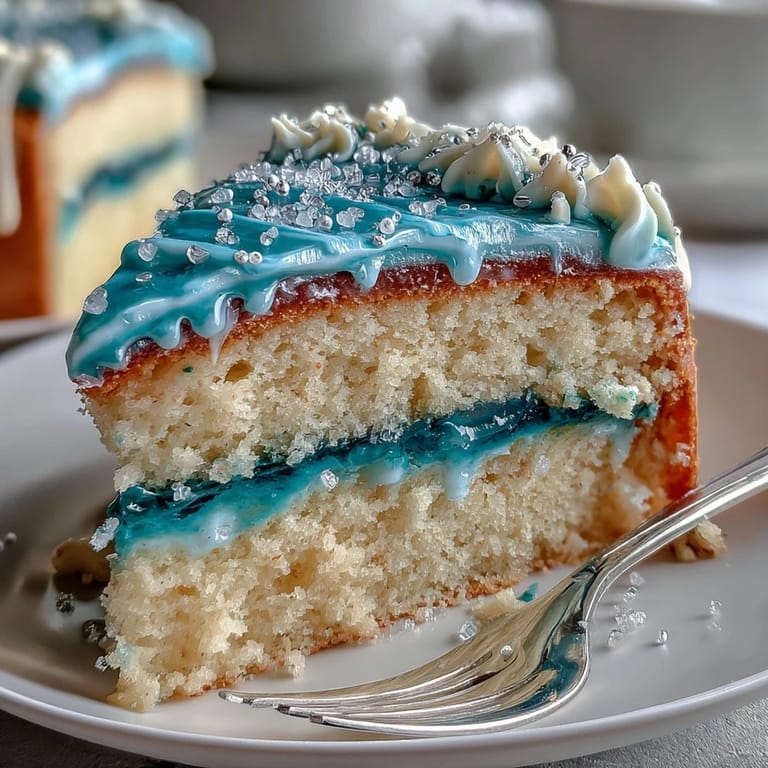
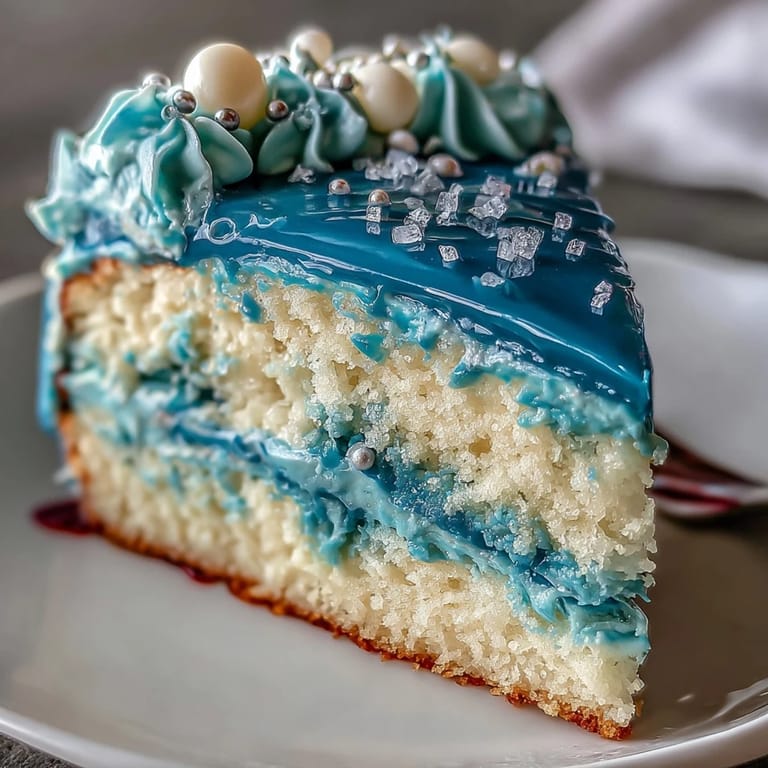
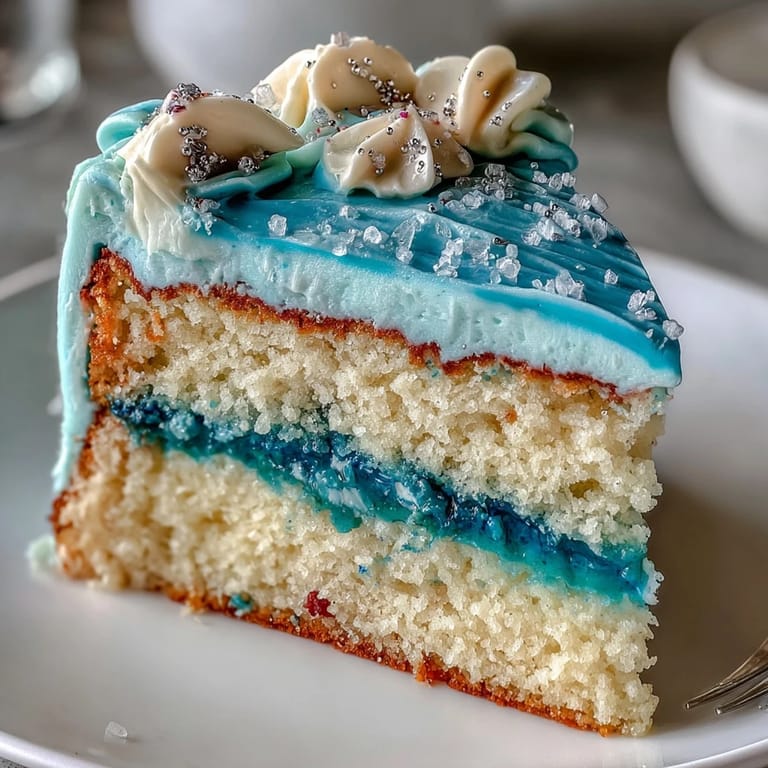
 The first time I ever dusted edible shells with shimmering pearl dust, it was a bit of an experiment. The soft hum of my kitchen fan mingled with the sweet scent of vanilla lingering in the air, and before I knew it, the counter was flecked with edible glitter. Making this Cancer Zodiac Cake felt less like baking and more like painting a canvas—with ocean blues and delicate edible shells shimmering under the lights, every swirl in the buttercream brought the seaside a little closer to home.
The most memorable run with this cake was during a July birthday party when we set the finished masterpiece in the middle of the table and everyone paused to admire it for just a moment. Even the youngest, usually fixated on grabbing the first slice, hesitated to break the scene—so entranced by how the edible shells sparkled in the afternoon sun. It was in that quiet, shared wonder that I realized how a homemade cake can become a centerpiece of celebration and connection.
What's for Dinner Tonight? 🤔
Stop stressing. Get 10 fast recipes that actually work on busy nights.
Free. No spam. Just easy meals.
Ingredients
- All-purpose flour: The backbone of the cake—make sure to spoon and level the flour for a light crumb.
- Baking powder: Fresh baking powder gives the cake its satisfying rise and airy texture.
- Salt: Just a bit sharpens the vanilla and rounds out the sweetness.
- Unsalted butter: Softened to room temperature, it creams luxuriously for both the cake and the ocean blue buttercream.
- Granulated sugar: Creaming sugar with butter helps capture air bubbles for a better rise.
- Eggs: Room temperature eggs blend more easily and make the batter smoother.
- Vanilla extract: Don’t skimp—real vanilla transforms every bite with a deep aroma.
- Whole milk: Adds richness and a tender crumb—slowly pour it as you alternate with flour.
- Powdered sugar: For the frosting, sift it well to avoid lumps and achieve a silky finish.
- Heavy cream: A splash or two will help whip your buttercream fluffy and light.
- Blue gel food coloring: Go slowly and layer for the perfect ocean depth, especially for wave effects.
- White chocolate chips/candy melts: They mold so easily for shells—microwave in short bursts so they dont scorch.
- Edible pearl or luster dust: Not essential but a little shimmer gives that genuine mystical shell effect.
- Shell-shaped silicone mold: Flexible molds make popping out the chilled shells a breeze.
- Edible glitter or shimmer spray: Just a dash on top is all you need for sea sparkle.
Instructions
- Set the Scene:
- Preheat your oven to 350F (175C) and grease two 8 inch round pans well, dusting them lightly with flour so nothing sticks.
- Mix the Dry Brigade:
- In a separate bowl, whisk together flour, baking powder, and salt until everything is thoroughly blended.
- Cream It Right:
- With an electric mixer, beat butter and sugar together until the mixture turns pale and fluffy, almost cloud like.
- Eggs and Vanilla:
- Add eggs one by one, letting each yolk disappear before the next goes in, then stir in that fragrant vanilla extract.
- Combine and Conquer:
- Alternately add in the dry mix and milk, starting and ending with dry—stir just until theres no streaks left, stopping as soon as the batter comes together.
- Bake the Layers:
- Divide the batter evenly between pans, smoothing the tops, and let bake for 30 35 minutes until they’re golden and a toothpick comes out mostly clean.
- Cool Down:
- Let cakes rest in pans for 10 minutes then finish cooling completely on a wire rack—patience keeps the layers perfectly shaped.
- Blend the Ocean Buttercream:
- Whip butter until creamy, add powdered sugar bit by bit, splash in vanilla and cream, then gradually mix in enough blue gel color to reach a sea worthy hue.
- Layer and Crumb Coat:
- If needed, use a knife to level the cakes, then stack with buttercream between the layers and around the sides for a quick crumb coat—chill for 20 minutes.
- Final Ocean Waves:
- Frost the cake with a thicker layer of blue buttercream, using an offset spatula to swirl in some wave texture.
- Make the Shells:
- Melt white chocolate in a microwave, stirring every 30 seconds, then pour into clean shell molds and chill until solid—gently pop them out and dust them with edible pearl if you like.
- Decorate With Flair:
- Arrange shells artistically across your cake and finish with a sprinkle of edible glitter or shimmer for that extra ocean glow.
- Chill and Serve:
- Keep the finished cake chilled until it’s time to serve and admire just how magical it looks before slicing.
 Pin Recipe
 When we finally cut into this cake after dinner, a hush fell over the table even as laughter still hovered in the air. Each slice felt like sharing a little piece of shimmering seashore, and for a short while, the conversation turned to favorite beaches and the kinds of shells everyone used to collect as kids.
Edible Shells: Easy Wins and Wobbles
Working with chocolate shells took a few tries before I learned to tap the mold on the counter—those bubbles can hide in every groove. The first time I forgot, half of my shells came out with funny little craters, but after practicing, each one turned out glossy and full of detail, almost too pretty to eat at all.
Shaping Buttercream Like Ocean Waves
I’ve found that using a small offset spatula lets me sculpt the buttercream into dynamic swirls and peaks, mimicking real waves. Sometimes I dab on different shades of blue for more depth, especially around the edges, and spatter a few edible pearls for that undersea flicker.
Serving and Styling for Maximum WOW
If you can, chill the whole finished cake for half an hour before presenting—it helps hold every detail and makes slicing smoother too. Arranging the shells just before guests arrive ensures they stay crisp and radiant.
- Let the cake sit at room temperature for 20 minutes before serving for the softest crumb
- Pair slices with lemony sparkling water for a bright contrast
- Leftover shells are delicious on ice cream—save a few!
 Pin Recipe
 Baking this Cancer Zodiac Cake always turns my kitchen into a playful, sea blue workshop. I hope yours brings smiles and a little bit of ocean magic to your next gathering.
Recipe FAQs
- → How do I achieve a vivid ocean-blue buttercream?
Use concentrated gel or paste colorants and add sparingly until you reach the shade you want. Mix thoroughly and rest briefly to let the color settle; add small amounts of white buttercream if you need to mute the hue without thinning the texture.
- → What keeps the buttercream stable for piping and texturing?
Beat the butter until creamy, add powdered sugar gradually, then incorporate cream to reach the right consistency. Chill after a thin crumb coat to firm the layers, which helps maintain texture when applying a decorative top coat.
- → How do I make shiny, realistic edible shells?
Melt white chocolate or candy melts gently, pour into clean shell molds, and chill until set. Unmold carefully and brush with pearl or luster dust for shimmer. Work quickly to avoid fingerprints and store shells refrigerated until decorating.
- → Can I prepare components ahead of time?
Yes. Bake layers a day ahead and wrap tightly. Buttercream keeps well refrigerated; bring to room temperature and re-whip slightly before use. Make chocolate shells up to several days ahead and store in a cool, dry place.
- → What flavor variations complement the vanilla base?
Bright additions like lemon zest or coconut extract pair beautifully with vanilla and blue buttercream. A light citrus curd between layers adds brightness, while shredded coconut enhances a tropical vibe.
- → How can I adapt this for common allergens?
Substitute dairy butter with a solid plant-based alternative and use non-dairy milk to make the batter and buttercream dairy-free. For egg-free options, use an appropriate egg replacer and adjust baking time and texture expectations accordingly.