 Pin Recipe
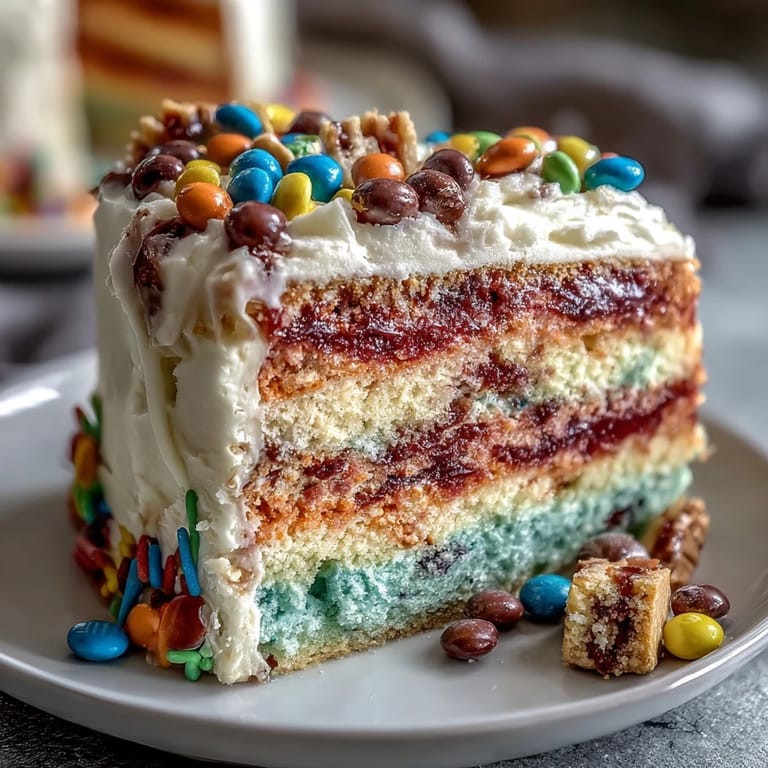
 My neighbor knocked on my kitchen door one afternoon with a wild idea: what if we made a cake that actually held a surprise inside, like a real piñata? We spent the next hour covered in flour and food coloring, arguing over whether blue or purple should go on the bottom layer, and by the time we pulled that first slice and watched the candies tumble out, we understood why she'd been so excited. This Cinco de Mayo Piñata Cake became our thing after that—the kind of dessert that makes people gasp when you cut into it, then immediately reach for seconds.
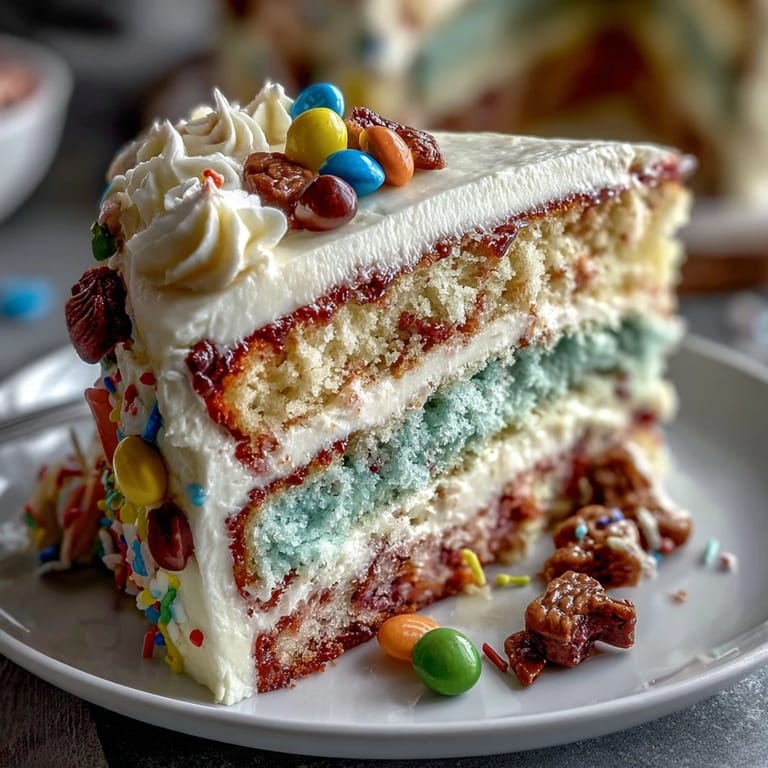
I made this cake for my daughter's fifth birthday party, and watching her little friends' faces when I sliced into it and candies scattered across their plates was pure magic. One kid actually gasped and said it was "a secret treasure cake," and suddenly this recipe felt like it was doing something bigger than just being dessert. That's when I realized certain dishes become memories before you even finish eating them.
What's for Dinner Tonight? 🤔
Stop stressing. Get 10 fast recipes that actually work on busy nights.
Free. No spam. Just easy meals.
Ingredients
- All-purpose flour (3 cups): The backbone of your cake structure; make sure it's fresh and aerated by whisking it before measuring.
- Baking powder and baking soda (2½ tsp and ½ tsp): Work together to give you that tender crumb and gentle lift; don't skip the sifting step.
- Unsalted butter (1 cup for cake, 1½ cups for frosting): Room temperature is non-negotiable here, or your batter won't cream properly and incorporate air.
- Granulated sugar (2 cups): Beating this with butter for a full three minutes creates the foundation for a fluffy cake; rushing this step changes everything.
- Eggs (4 large, room temperature): Cold eggs won't blend smoothly into the batter and can break your emulsion; take them out thirty minutes before baking.
- Vanilla extract (2 tsp for cake, 2 tsp for frosting): The secret ingredient that makes people ask what that incredible flavor is.
- Whole milk (1¼ cups for cake, ¼ cup for frosting): Room temperature milk prevents shocking your batter and keeps everything smooth.
- Gel food coloring (red, orange, yellow, green, blue, purple): Gel holds color better than liquid and won't thin out your batter the way liquid coloring does.
- Assorted small candies (1½ cups): This is your piñata surprise, so choose things you actually love eating; mini M&Ms, gummy bears, and rainbow sprinkles work beautifully together.
- Powdered sugar (5 cups, sifted): Sifting removes lumps and makes frosting silky smooth; this matters more than you'd think.
- Salt: A small pinch in both cake and frosting balances sweetness and brings out the vanilla.
Instructions
- Set the Stage:
- Preheat your oven to 350°F and prepare three 8-inch round pans by greasing and lining them with parchment paper. This takes five minutes but prevents the heartbreak of a stuck cake.
- Build Your Dry Foundation:
- Whisk together flour, baking powder, baking soda, and salt in a medium bowl, then set aside. This combination creates lift and tender crumbs when it meets the wet ingredients.
- Cream Butter and Sugar:
- Beat softened butter and sugar together for about three minutes until it looks pale, fluffy, and cloud-like. This isn't rushing; take your time here because you're incorporating air that will make your cake light.
- Incorporate Your Eggs:
- Add eggs one at a time, beating well after each addition until the mixture is smooth. This gradual approach ensures your batter stays emulsified and stays together.
- Add Your Vanilla:
- Mix in vanilla extract, then prepare to alternate your dry and wet ingredients, starting and ending with the dry mixture. This sandwich technique prevents overmixing, which is how you end up with dense, tough cake.
- Create Your Rainbow:
- Divide your batter evenly into six bowls and add a different gel food coloring to each one, stirring gently until the color is uniform. The colors should be vibrant but not so dark they overpower the vanilla flavor.
- Fill and Bake:
- Pour each colored batter into its own prepared pan and smooth the tops, then bake for fifteen to eighteen minutes until a toothpick comes out clean. The kitchen will smell absolutely incredible, and that's your signal to start thinking about frosting.
- Cool with Patience:
- Let layers cool in the pans for ten minutes, then transfer to wire racks to cool completely. Warm cake layers will slide around when you stack them, so don't rush this part.
- Create Your Cavity:
- Once completely cool, use a 3-inch round cutter to carefully cut out the center of four of your six layers, creating hollow rings. Save those scraps for snacking; baker's privilege.
- Make Your Frosting:
- Beat softened butter until creamy, then gradually add powdered sugar, milk, vanilla, and salt, beating until smooth and fluffy. If it seems thick, add milk a teaspoon at a time until you reach spreadable consistency.
- Assemble with Intention:
- Place your purple layer (solid, no cutout) on a serving plate, spread a thin frosting layer, then stack the first cutout layer on top. Continue this pattern, stacking all four cutout layers with frosting between each one.
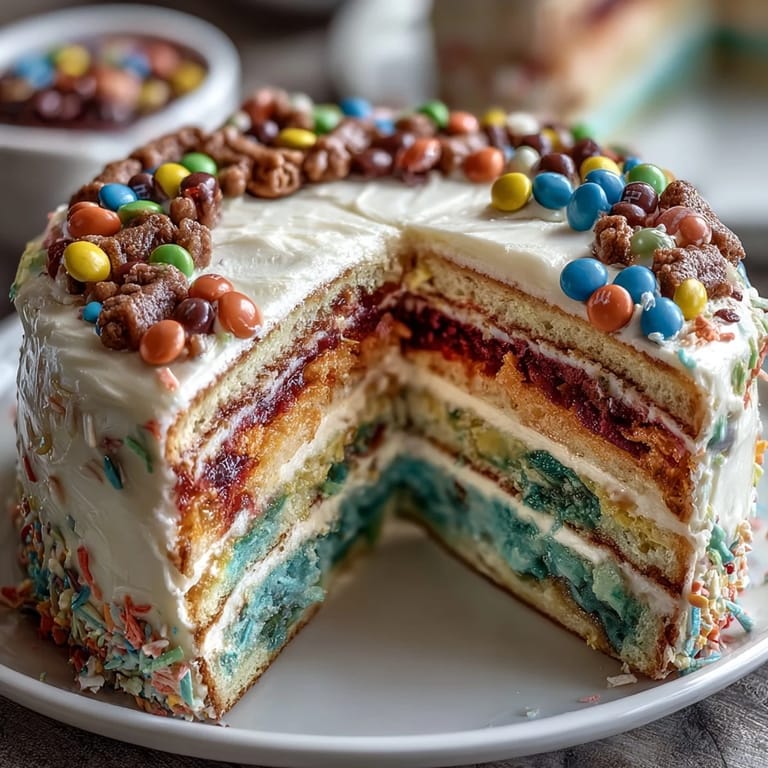
- Fill the Secret:
- Pour your assorted candies into the center cavity you've created, filling it generously but not overstuffing. This is the moment where the magic actually happens.
- Crown Your Cake:
- Place your final whole layer (the top) over the candy-filled cavity, creating a sealed secret inside. Frost the entire outside generously with remaining frosting.
- Decorate and Chill:
- Add colored frosting, sprinkles, or any festive decorations you love, then refrigerate for at least thirty minutes. Cold cake is easier to slice cleanly and reveals your candy surprise beautifully.
 Pin Recipe
 There's something about pulling a slice from this cake and hearing someone at the table literally say "wow" that makes all the coloring and stacking and planning feel worthwhile. My husband now requests this every celebration, not because it's the fanciest cake, but because it's the most fun one to eat.
The Rainbow Layer Decision
Choosing which color goes where matters more than you'd think, not for flavor but for the visual story. I've learned that putting purple or dark colors on the bottom layer makes the progression feel intentional as you move up, while finishing with yellow or white on top looks bright and celebratory. Some people stick to traditional rainbow order; others create ombre effects or wild combinations. There's no wrong way here, just your way.
Candy Choices That Actually Work
Not all candies are created equal when it comes to hiding inside a cake. Mini M&Ms, gummy bears, crushed candy canes, and rainbow sprinkles all stay intact and taste great when surrounded by cake and frosting, but chewy caramels or anything sticky will make cutting messy. Hard candies are fine too, though some people worry about biting down on them, so know your crowd. The assortment matters because that mix of textures is part of the surprise.
Make-Ahead Magic and Storage
You can bake these layers the day before and store them wrapped tightly at room temperature, then assemble everything the morning of your event if timing feels tight. The frosted, assembled cake will keep beautifully in the refrigerator for up to three days, though the texture stays best if you serve it within forty-eight hours. Slice with a sharp, clean knife dipped in hot water between each cut for clean, impressive pieces that show off your candy surprise.
- Gluten-free bakers can swap a 1:1 gluten-free flour blend without changing any other measurements or techniques.
- If you only have two pans instead of three, bake in batches and it'll take longer but the cakes will be just as beautiful.
- Keep extra frosting on hand for patching any small cracks that appear during assembly.
 Pin Recipe
 This cake proves that a little color, some candies, and careful stacking can turn an ordinary dessert into something that feels like celebration. Make it for someone you love, watch their face when that first slice reveals the surprise, and you'll understand why this has become the cake people request.
Recipe FAQs
- → What colors are used for the cake layers?
Red, orange, yellow, green, blue, and purple gel food coloring are used to create vibrant layers.
- → How is the candy filled inside the cake?
Four of the six layers are hollowed out with a round cutter, then stacked with frosting and candy poured into the center cavity before the final layer is placed on top.
- → Can this cake be made gluten-free?
Yes, substitute all-purpose flour with a 1:1 gluten-free flour blend to accommodate gluten sensitivities.
- → What is the best way to slice the cake?
Chilling the cake for 30 minutes before slicing helps keep the layers firm and reveals the candy surprise cleanly.
- → Are there alternative fillings for the candy center?
Small assorted candies like mini chocolates, sprinkles, or gummies work well; avoid large or sticky items.